Visual Studio, Windows, C++, OpenGL ES, GLFW, GLAD
Запуск OpenGL ES на PC не такой прямолинейный как на Android-е поскольку GL ES предназначен для мобильников, а НЕ для десктопов. Но варианты есть. Издатели OpenGL-а настоятельно рекомендуют использовать window toolkit (GLFW) и OpenGL loading libraries (GLAD). Значит, давайте их сгрузим.
1. Сперва зарезервируем для них место.
В Windows File Explorer-е в нашем корневом C:\CPP создадим под-каталог “p_windows” (“p” is for “platform”). Там мы будем держать windows-specific вещи, применимые ко ВСЕМ проектам.
- Download GLFW.
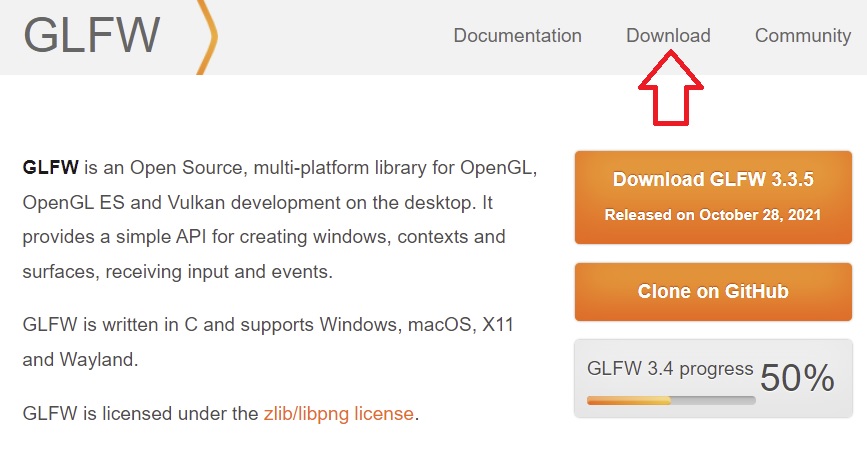
Идем на https://www.glfw.org/
Переходим на Download link который сверху:
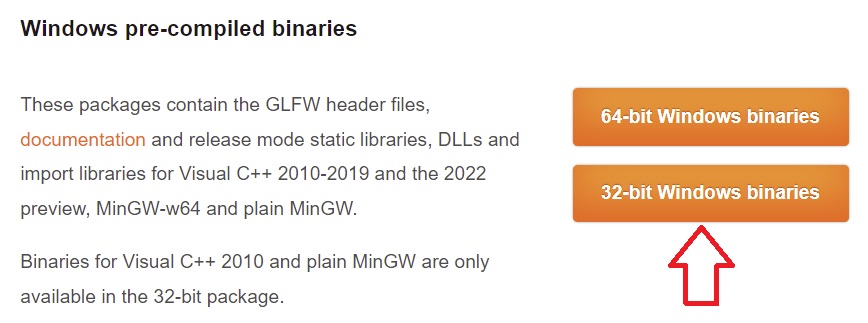
Нам нужны 32-bit Windows pre-compiled binaries. Почему 32? Потому что они работают на 32 И на 64-bit Windows тоже, так что выбираем 32 как более “cross-platform-енный”:
Когда сгрузилось, в Windows File Explorer-е идем в каталог Downloads, разворачиваем glfw-3.3.5.bin.WIN32.zip (right-click на файл -> Open with -> 7-Zip File Manager -> Extract).
ВАЖНО: Поменять destination (Copy to) на C:\CPP\p_windows\
Затем – Ok.
В Windows File Explorer-е идем в каталог C:\CPP\p_windows\ и переименуем извлеченный glfw-3.3.5.bin.WIN32 каталог в glfw335win32.
- Download GLAD.
Во-первых – под C:\CPP\p_windows\ добавим новый под-каталог “glad“.
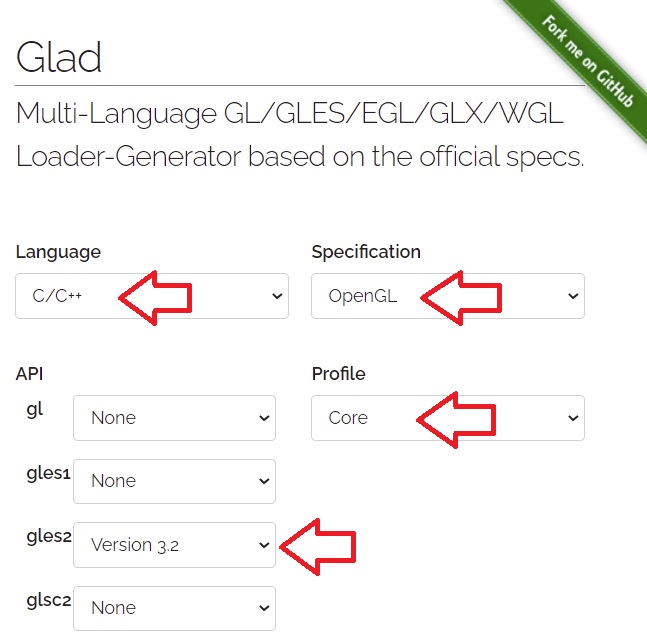
Теперь идем на https://glad.dav1d.de/
- Language: C/C++,
- Specification: OpenGL
- Меняем Profile на Core,
- Под gles2 выбираем Version 3.2:
Scroll down (прокручиваем вниз).
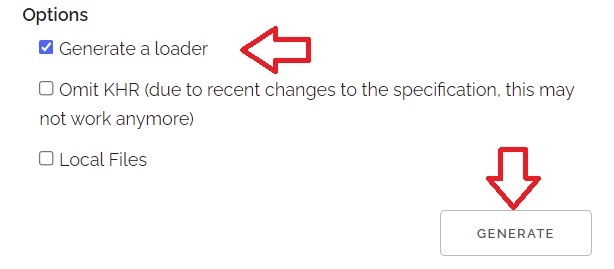
Оставляем “Generate a loader” отмеченным.
Жмем Generate:
На следующем экране сгружаем “glad.zip”.
ИЛИ: можно сгрузить здесь.Когда сгрузилось, идем в каталог Downloads и разворачиваем glad.zip в C:\CPP\p_windows\glad.
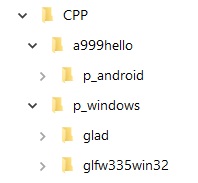
Теперь наша структура такая:
- Create VS project.
На GLFW вебсайте есть хороший пример/обучалка, которым мы и воспользуемся. Этот пример написан под OpenGL ES 2.0. Под 3.2 пришлось его маленько подрихтовать. Для создания окна пример использует GLFW, так что мы создадим не “Windows”, а Console project.
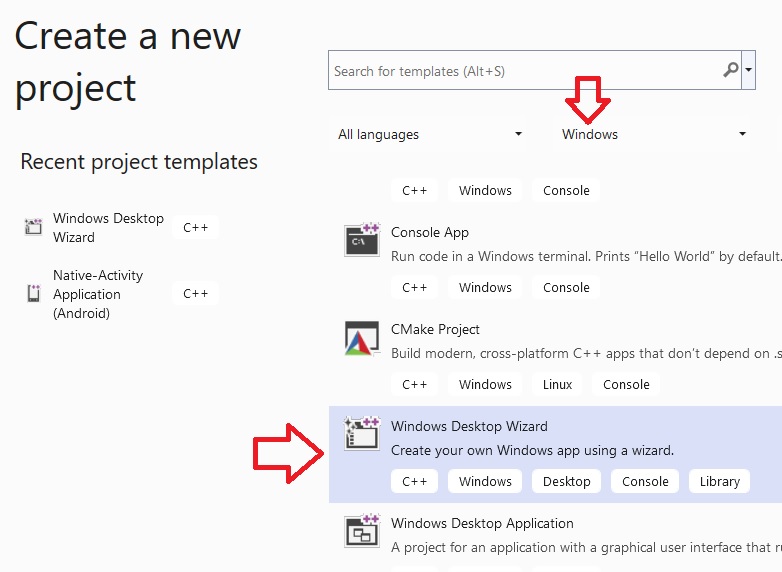
Запускаем Visual Studio, Create a new project, выбираем Windows фильтр, выбираем Windows Desktop Wizard:
Затем – Next.
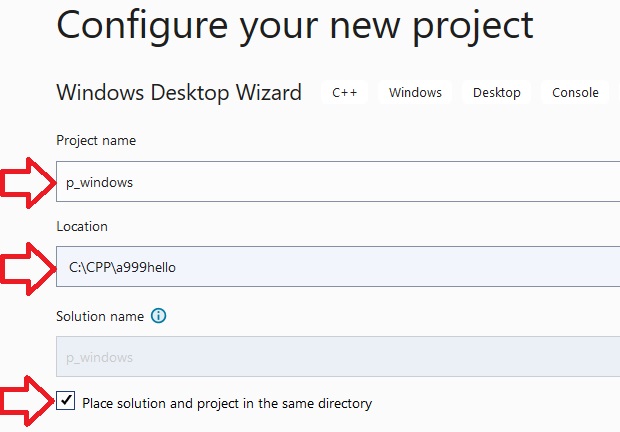
- Project name – “p_windows” (“p” for “platform”).
- Location – C:\CPP\a999hello
- Place solution and project in the same directory – yes:
Затем – Create.
На следующем экране выбираем “Console Application (.exe)” и “Empty project”:
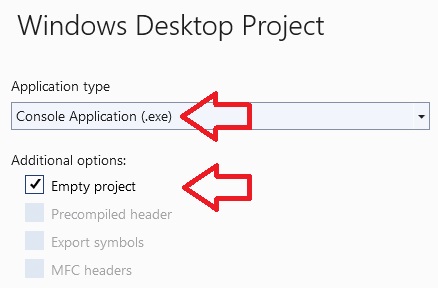
Затем – Ok.
- Source code.
Right-click на “p_windows” project (не на solution), затем Add -> New item.
На <Add New Item> экране выбираем “C++ File (.cpp)”, name – “main.cpp”:
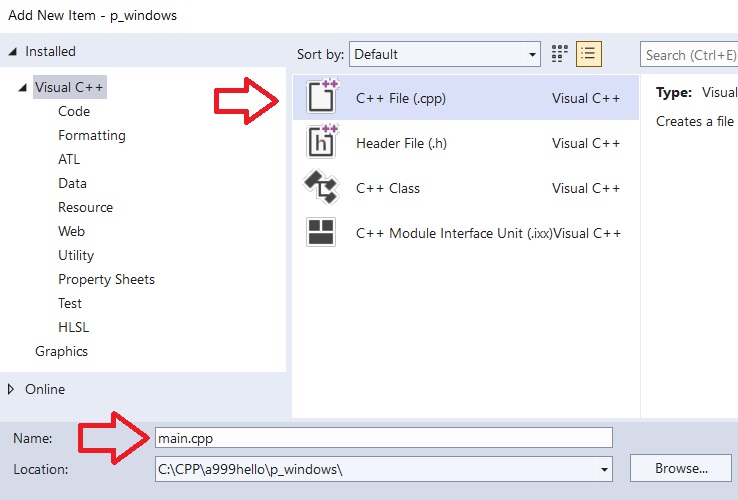
Затем – Add.
Copy-Paste следующий код в main.cpp:
#include <glad/glad.h>
#define GLFW_INCLUDE_NONE
#include <GLFW/glfw3.h>

#include "linmath.h"

#include <stdlib.h>
#include <stdio.h>

static const struct
{
    float x, y;
    float r, g, b;
} vertices[3] =
{
    { -0.6f, -0.4f, 1.f, 0.f, 0.f },
    {  0.6f, -0.4f, 0.f, 1.f, 0.f },
    {   0.f,  0.6f, 0.f, 0.f, 1.f }
};

static const char* vertex_shader_text =
"#version 320 es\n"
"precision lowp float;\n"
"uniform mat4 MVP;\n"
"in vec3 vCol;\n"
"in vec2 vPos;\n"
"out vec3 color;\n"
"void main()\n"
"{\n"
"    gl_Position = MVP * vec4(vPos, 0.0, 1.0);\n"
"    color = vCol;\n"
"}\n";

static const char* fragment_shader_text =
"#version 320 es\n"
"precision lowp float;\n"
"in vec3 color;\n"
"out vec4 FragColor;\n"
"void main()\n"
"{\n"
"    FragColor = vec4(color, 1.0);\n"
"}\n";

static void error_callback(int error, const char* description)
{
    fprintf(stderr, "Error: %s\n", description);
}

static void key_callback(GLFWwindow* window, int key, int scancode, int action, int mods)
{
    if (key == GLFW_KEY_ESCAPE && action == GLFW_PRESS)
        glfwSetWindowShouldClose(window, GLFW_TRUE);
}

int main(void)
{
    GLFWwindow* window;
    unsigned int vao_buffer, vertex_buffer, vertex_shader, fragment_shader, program;
    int mvp_location, vpos_location, vcol_location;
    float angle_z = 0;

    glfwSetErrorCallback(error_callback);

    if (!glfwInit())
        exit(EXIT_FAILURE);

    glfwWindowHint(GLFW_CONTEXT_VERSION_MAJOR, 3);
    glfwWindowHint(GLFW_CONTEXT_VERSION_MINOR, 2);

    window = glfwCreateWindow(640, 480, "OurProject", NULL, NULL);
    if (!window)
    {
        glfwTerminate();
        exit(EXIT_FAILURE);
    }

    glfwSetKeyCallback(window, key_callback);

    glfwMakeContextCurrent(window);
    gladLoadGLES2Loader((GLADloadproc)glfwGetProcAddress); //gladLoadGL(glfwGetProcAddress);
    glfwSwapInterval(1);

    // NOTE: OpenGL error checks have been omitted for brevity

    glGenVertexArrays(1, &vao_buffer);
    glBindVertexArray(vao_buffer);

    glGenBuffers(1, &vertex_buffer);
    glBindBuffer(GL_ARRAY_BUFFER, vertex_buffer);
    glBufferData(GL_ARRAY_BUFFER, sizeof(vertices), vertices, GL_STATIC_DRAW);

    vertex_shader = glCreateShader(GL_VERTEX_SHADER);
    glShaderSource(vertex_shader, 1, &vertex_shader_text, NULL);
    glCompileShader(vertex_shader);

    fragment_shader = glCreateShader(GL_FRAGMENT_SHADER);
    glShaderSource(fragment_shader, 1, &fragment_shader_text, NULL);
    glCompileShader(fragment_shader);

    program = glCreateProgram();
    glAttachShader(program, vertex_shader);
    glAttachShader(program, fragment_shader);
    glLinkProgram(program);

    mvp_location = glGetUniformLocation(program, "MVP");
    vpos_location = glGetAttribLocation(program, "vPos");
    vcol_location = glGetAttribLocation(program, "vCol");

    glEnableVertexAttribArray(vpos_location);
    glVertexAttribPointer(vpos_location, 2, GL_FLOAT, GL_FALSE,
        sizeof(vertices[0]), (void*)0);
    glEnableVertexAttribArray(vcol_location);
    glVertexAttribPointer(vcol_location, 3, GL_FLOAT, GL_FALSE,
        sizeof(vertices[0]), (void*)(sizeof(float) * 2));

    while (!glfwWindowShouldClose(window))
    {
        float ratio;
        int width, height;
        mat4x4 m, p, mvp;

        glfwGetFramebufferSize(window, &width, &height);
        ratio = width / (float)height;

        glViewport(0, 0, width, height);
        glClear(GL_COLOR_BUFFER_BIT);

        mat4x4_identity(m);
        mat4x4_rotate_Z(m, m, (float)glfwGetTime());
        mat4x4_ortho(p, -ratio, ratio, -1.f, 1.f, 1.f, -1.f);
        mat4x4_mul(mvp, p, m);

        glUseProgram(program);
        glUniformMatrix4fv(mvp_location, 1, GL_FALSE, (const GLfloat*)mvp);
        glDrawArrays(GL_TRIANGLES, 0, 3);

        glfwSwapBuffers(window);
        glfwPollEvents();
    }

    glfwDestroyWindow(window);

    glfwTerminate();
    exit(EXIT_SUCCESS);
}
- ES 3.2-related изменения отмечены.
6. Еще в этом примере используется “linmath.h” – библиотечка для линейной алгебры.
Сгрузить можно здесь.Поскольку мы будем использовать ее и в других проектах, расположим ее вне a999hello каталога.
В Windows File Explorer-е создадим новый под-каталог: C:\CPP\engine\
Копируем сгруженный linmath.h файл из каталога Downloads в
C:\CPP\engine\
В Visual Studio right-click на p_windows project -> Add -> New Filter.
Name – xEngine
- “Filter” – это типа виртуального под-каталога в VS проекте.
- “x” перед “Engine” – просто чтоб он был под “Source Files” (он будет “под” когда вернемся в VS в следующий раз).
Теперь – right-click на xEngine -> Add -> Existing Item
C:\CPP\engine\linmath.h
7. Также в проект нужно добавить файл glad.c (из GLAD каталога).
Right-click на “Source Files” -> Add -> Existing item
C:\CPP\p_windows\glad\src\glad.c
Add.
- Теперь надо задать ссылки на сгруженные библиотеки.
Right-click на “p_windows” project -> Properties.
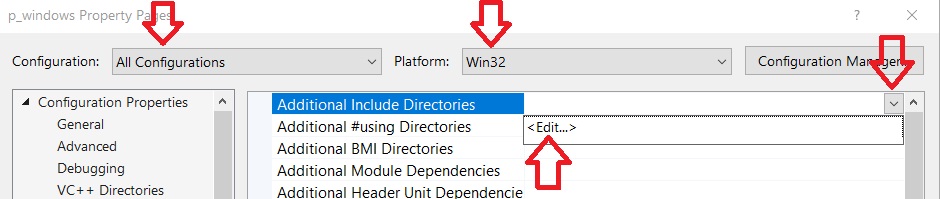
ВАЖНО: Поменять Configuration с “Debug” на “All configurations”. Поменять platform на Win32 (x64 работать не будет из-за GLFW32):
Теперь идем в Configuration properties -> C++ -> General и открываем Additional Include Directories -> Edit:
В Edit window добавляем новую строку:
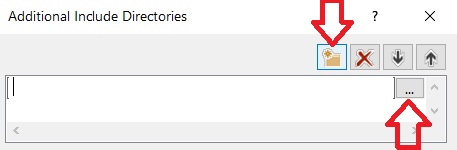
и идем на C:\CPP\p_windows\glad\include, Select Folder
Теперь добавляем еще одну строку и идем на
C:\CPP\p_windows\glfw335win32\include, Select Folder.
Добавляем еще строку и идем на
C:\CPP\engine, Select Folder.
Теперь у нас:
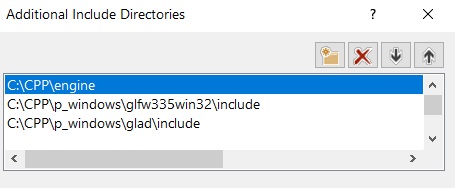
Затем – Ok.
9. Теперь переходим в Configuration properties -> Linker -> General и открываем Additional Library Directories -> Edit.
Добавляем новую строку и идем на C:\CPP\p_windows\glfw335win32\lib-vc2022
Select Folder, Ok.
10. Теперь переходим в Configuration properties -> Linker -> Input и открываем Additional Dependencies -> Edit.
Copy-Paste следующую строку (3 библиотеки):
opengl32.lib; glfw3.lib; glfw3dll.lib
Ok, Apply, Ok.
11. Еще: Мы же не хотим, чтобы наш екзешник назывался “p_windows.exe” (как это задано названием проекта). Название можно поменять в project properties.
Right-click на p_windows project -> Properties -> Configuration Properties -> General, выбираем Target name.
Чтобы изменить – жмем стрелку вниз, и Edit.
Поменяем имя на “OurProject”.
Затем – Ok, Apply, Ok.
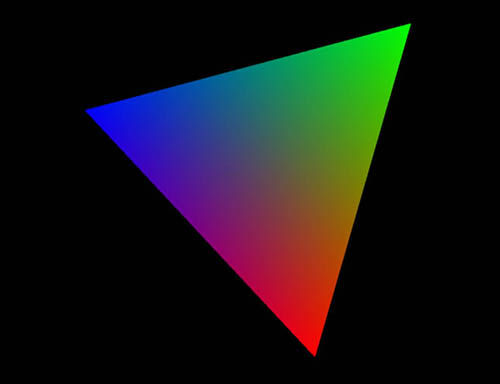
12. Теперь запуск (зеленая стрелка).
- Проверьте что выбранная платформа (в верхнем меню) x86 (32 бита, поскольку x64 работать не будет из-за GLFW32).
Работает:
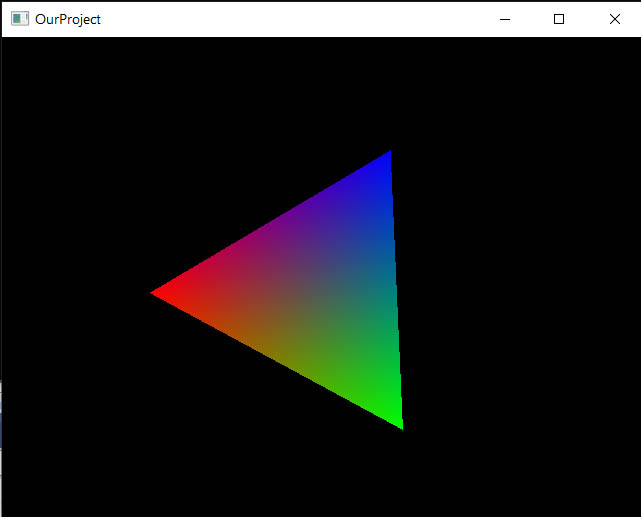
Пример работает, но у нас ДВА окна: Console window И Application window. Причина в том, что мы не хотели создавать окно по-Windows-овски, и поэтому выбрали “Console application” и создали окно через GLFW.
Как убрать окно Консоли:
13. Вообще-то, иметь Console window совсем даже неплохо, поскольку оно может принимать printf команды (OpenGL окно – НЕ может), что бесценно для разработки и отладки, так что мы лучше оставим окно Консоли в Debug конфигурации как есть, но уберем его из Release.
Right-click на “p_windows” project, открываем Properties.
Меняем Configuration на Release.
Идем в Configuration Properties -> Linker -> System и меняем SubSystem с Console на Windows
Apply, Ok.
Теперь, если попробовать скомпилировать (в Release конфигурации), то получим ошибку:
Error LNK2001 unresolved external symbol _WinMain@16
Это потому что теперь линкер ищет входную точку WinMain(), а не main().
Если мы хотим оставить main() (а мы хотим), то надо переустановить входную точку на mainCRTStartup (это в Advanced Linker-е).
Снова открываем project Properties, Release configuration.
Идем в Configuration Properties -> Linker -> Advanced. Открываем Entry Point -> Edit. Меняем на mainCRTStartup
Ok, Apply, Ok.
Теперь Debug конфигурация работает с Console window, Release – без.