Теперь попробуем запустить TheGame класс на Android-е.
1. Запускаем Visual Studio, открываем C:\CPP\a999hello\p_android\p_android.sln solution.
2. Под p_android.NativeActivity проектом добавим “xTheGame” фильтр:
Right-click на p_android.NativeActivity project -> Add -> New Filter. Name – xTheGame
- Под xTheGame добавим Existing Item:
Right-click на xTheGame -> Add -> Existing Item,
Идем на C:\CPP\a999hello
Файлы – TheGame.cpp и TheGame.h
Add.
- Оповестим p_android.NativeActivity проект, где искать TheGame.h.
Right-click на p_android.NativeActivity project -> Properties, All Configurations, ARM64, C/C++ -> General-> Additional Include Directories -> Edit, добавим новую строку.
Внимание: вместо перехода на C:\CPP\a999hello (где TheGame и расположен), вручную введем
../..2 точки, косая, 2 точки, что означает ДВА уровня вверх (от p_android.NativeActivity корневого каталога проекта).
Ok, Apply, Ok.
- Добавим ссылку на linmath.h (требуется TheGame классом).
Файл находится в каталоге C:/CPP/engine.
Под p_android.NativeActivity проектом добавим новый фильтр, имя – xEngine.
Под xEngine add Existing Item C:\CPP\engine\linmath.h
Добавим ссылку: right-click на p_android.NativeActivity project -> Properties, All Configurations, ARM64, C/C++ -> General, Additional Include Directories -> Edit, добавить строку, перейти на C:\CPP\engine, Select Folder, Ok, Apply, Ok.
6. Перенесем Android-овскую реализацию myPollEvents и mySwapBuffers в platform.h/cpp. Заодно перенесем mylog() в .cpp тоже.
Откроем platform.h и заменим код на:
#pragma once

void mylog(const char* _Format, ...);
void mySwapBuffers();
void myPollEvents();
7. Под xPlatform добавим новый C++ file,
Name – platform.cpp
Location: C:\CPP\p_android\
Код:
#include <android/log.h>
#include "stdio.h"
#include "TheGame.h"

extern struct android_app* androidApp;
extern const ASensor* accelerometerSensor;
extern ASensorEventQueue* sensorEventQueue;

extern EGLDisplay androidDisplay;
extern EGLSurface androidSurface;
extern TheGame theGame;

void mylog(const char* _Format, ...) {
#ifdef _DEBUG
    char outStr[1024];
    va_list _ArgList;
    va_start(_ArgList, _Format);
    vsprintf(outStr, _Format, _ArgList);
    __android_log_print(ANDROID_LOG_INFO, "mylog", outStr, NULL);
    va_end(_ArgList);
#endif
};

void mySwapBuffers() {
	eglSwapBuffers(androidDisplay, androidSurface);
}
void myPollEvents() {
	// Read all pending events.
	int ident;
	int events;
	struct android_poll_source* source;

	// If not animating, we will block forever waiting for events.
	// If animating, we loop until all events are read, then continue
	// to draw the next frame of animation.
	while ((ident = ALooper_pollAll(0, NULL, &events,
		(void**)&source)) >= 0) {

		// Process this event.
		if (source != NULL) {
			source->process(androidApp, source);
		}

		// If a sensor has data, process it now.
		if (ident == LOOPER_ID_USER) {
			if (accelerometerSensor != NULL) {
				ASensorEvent event;
				while (ASensorEventQueue_getEvents(sensorEventQueue,
					&event, 1) > 0) {
					//LOGI("accelerometer: x=%f y=%f z=%f",
					//	event.acceleration.x, event.acceleration.y,
					//	event.acceleration.z);
				}
			}
		}

		// Check if we are exiting.
		if (androidApp->destroyRequested != 0) {
			theGame.bExitGame = true;
			break;
		}
	}
}
8. Поменяем main.cpp на вызов TheGame класса вместо рисования зеленого экрана.
Откроем main.cpp и заменим код на:
#include "platform.h"
#include "TheGame.h"

TheGame theGame;

struct android_app* androidApp;

ASensorManager* sensorManager;
const ASensor* accelerometerSensor;
ASensorEventQueue* sensorEventQueue;

EGLDisplay androidDisplay;
EGLSurface androidSurface;
EGLContext androidContext;

/**
* Initialize an EGL context for the current display.
*/
static int engine_init_display(struct engine* engine) {
	// initialize OpenGL ES and EGL

	/*
	* Here specify the attributes of the desired configuration.
	* Below, we select an EGLConfig with at least 8 bits per color
	* component compatible with on-screen windows
	*/
	const EGLint attribs[] = {
		EGL_SURFACE_TYPE, EGL_WINDOW_BIT,
		EGL_BLUE_SIZE, 8,
		EGL_GREEN_SIZE, 8,
		EGL_RED_SIZE, 8,
		EGL_NONE
	};
	EGLint format;
	EGLint numConfigs;
	EGLConfig config;
	EGLSurface surface;
	EGLContext context;

	EGLDisplay display = eglGetDisplay(EGL_DEFAULT_DISPLAY);

	eglInitialize(display, 0, 0);

	/* Here, the application chooses the configuration it desires. In this
	* sample, we have a very simplified selection process, where we pick
	* the first EGLConfig that matches our criteria */
	eglChooseConfig(display, attribs, &config, 1, &numConfigs);

	/* EGL_NATIVE_VISUAL_ID is an attribute of the EGLConfig that is
	* guaranteed to be accepted by ANativeWindow_setBuffersGeometry().
	* As soon as we picked a EGLConfig, we can safely reconfigure the
	* ANativeWindow buffers to match, using EGL_NATIVE_VISUAL_ID. */
	eglGetConfigAttrib(display, config, EGL_NATIVE_VISUAL_ID, &format);

	ANativeWindow_setBuffersGeometry(androidApp->window, 0, 0, format);

	surface = eglCreateWindowSurface(display, config, androidApp->window, NULL);

	EGLint contextAttribs[] =
	{
		EGL_CONTEXT_CLIENT_VERSION, 3,
		EGL_NONE
	};
	context = eglCreateContext(display, config, NULL, contextAttribs);


	if (eglMakeCurrent(display, surface, surface, context) == EGL_FALSE) {
		mylog("ERROR: Unable to eglMakeCurrent");
		return -1;
	}

	androidDisplay = display;
	androidContext = context;
	androidSurface = surface;

	// Initialize GL state.
	glEnable(GL_CULL_FACE);
	glDisable(GL_DEPTH_TEST);

	return 0;
}

/**
* Tear down the EGL context currently associated with the display.
*/
static void engine_term_display() {

	if (androidDisplay != EGL_NO_DISPLAY) {
		eglMakeCurrent(androidDisplay, EGL_NO_SURFACE, EGL_NO_SURFACE, EGL_NO_CONTEXT);
		if (androidContext != EGL_NO_CONTEXT) {
			eglDestroyContext(androidDisplay, androidContext);
		}
		if (androidSurface != EGL_NO_SURFACE) {
			eglDestroySurface(androidDisplay, androidSurface);
		}
		eglTerminate(androidDisplay);
	}
	androidDisplay = EGL_NO_DISPLAY;
	androidContext = EGL_NO_CONTEXT;
	androidSurface = EGL_NO_SURFACE;
}

/**
* Process the next input event.
*/
static int32_t engine_handle_input(struct android_app* app, AInputEvent* event) {
	if (AInputEvent_getType(event) == AINPUT_EVENT_TYPE_MOTION) {
		//engine->state.x = AMotionEvent_getX(event, 0);
		//engine->state.y = AMotionEvent_getY(event, 0);
		return 1;
	}
	return 0;
}

/**
* Process the next main command.
*/
static void engine_handle_cmd(struct android_app* app, int32_t cmd) {
	struct engine* engine = (struct engine*)app->userData;
	switch (cmd) {
	case APP_CMD_INIT_WINDOW:
		// The window is being shown, get it ready.
		if (androidApp->window != NULL) {
			engine_init_display(engine);
			//engine_draw_frame(engine);
		}
		break;
	case APP_CMD_TERM_WINDOW:
		// The window is being hidden or closed, clean it up.
		engine_term_display();
		break;
	case APP_CMD_GAINED_FOCUS:
		// When our app gains focus, we start monitoring the accelerometer.
		if (accelerometerSensor != NULL) {
			ASensorEventQueue_enableSensor(sensorEventQueue,
				accelerometerSensor);
			// We'd like to get 60 events per second (in microseconds).
			ASensorEventQueue_setEventRate(sensorEventQueue,
				accelerometerSensor, (1000L / 60) * 1000);
		}
		break;
	case APP_CMD_LOST_FOCUS:
		// When our app loses focus, we stop monitoring the accelerometer.
		// This is to avoid consuming battery while not being used.
		if (accelerometerSensor != NULL) {
			ASensorEventQueue_disableSensor(sensorEventQueue,
				accelerometerSensor);
		}
		// Also stop animating.
		//engine_draw_frame(engine);
		break;
	}
}

/**
* This is the main entry point of a native application that is using
* android_native_app_glue.  It runs in its own thread, with its own
* event loop for receiving input events and doing other things.
*/
void android_main(struct android_app* state) {

	//state->userData = &engine;
	state->onAppCmd = engine_handle_cmd;
	state->onInputEvent = engine_handle_input;
	androidApp = state;

	// Prepare to monitor accelerometer
	sensorManager = ASensorManager_getInstance();
	accelerometerSensor = ASensorManager_getDefaultSensor(sensorManager,
		ASENSOR_TYPE_ACCELEROMETER);
	sensorEventQueue = ASensorManager_createEventQueue(sensorManager,
		state->looper, LOOPER_ID_USER, NULL, NULL);

	// Read all pending events.
	int ident;
	int events;
	struct android_poll_source* source;
	//wait for display
	while (androidDisplay == NULL) {
		// No display yet.
		//std::this_thread::sleep_for(std::chrono::seconds(1));
		mylog("No display yet\n");
		//wait for event
		while ((ident = ALooper_pollAll(0, NULL, &events,
			(void**)&source)) >= 0) {
			// Process this event.
			if (source != NULL) {
				source->process(state, source);
			}
		}
	}

	EGLint w, h;
	eglQuerySurface(androidDisplay, androidSurface, EGL_WIDTH, &w);
	eglQuerySurface(androidDisplay, androidSurface, EGL_HEIGHT, &h);
	theGame.onScreenResize(w, h);

	theGame.run();

	engine_term_display();
}
- Там еще одно 3.2-related изменение (eglCreateContext, тоже отмечено).
9. В текущей конфигурации builder не находит math библиотек. Надо строить с ключом -lm.
Открываем p_android.NativeActivity properties, All Configurations, ARM64, идем в Configuration Properties -> Linker -> All Options, открываем Additional Options -> Edit, добавляем
-lmOk, Apply, Ok.
10. И еще один декоративный штрих ради единообразия с Windows проектом:
Под p_android.NativeActivity проектом добавим новый фильтр “Source Files“
В Solution Explorer-е (правая панель) drag-and-drop исходные исходники в Source Files:
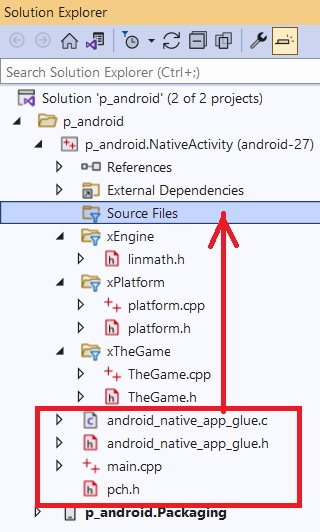
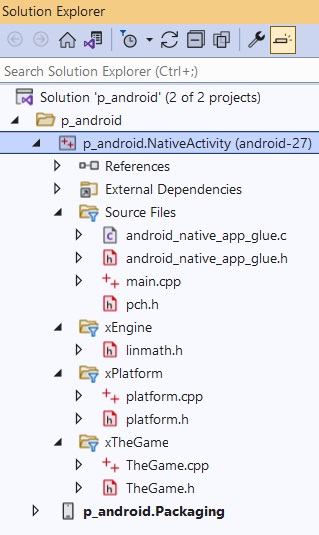
Теперь структура такая:
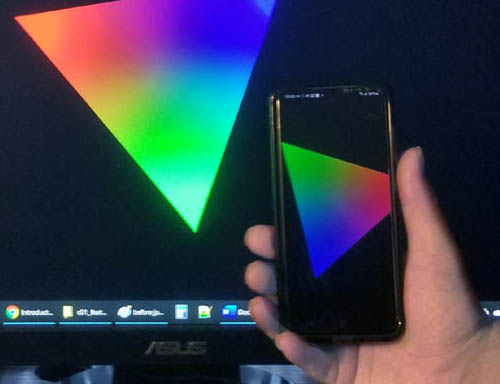
11. Включаем Android, разблокируем, подключаем к PC USB кабелем, разрешаем debugging, запускаем:
Ta-дa!
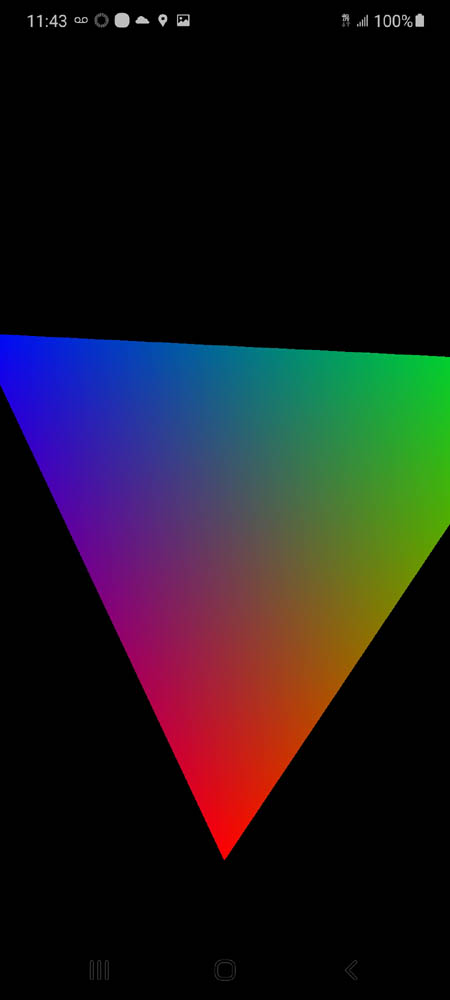
Работает на ОБОИХ, на Android-е И на Windows-е!
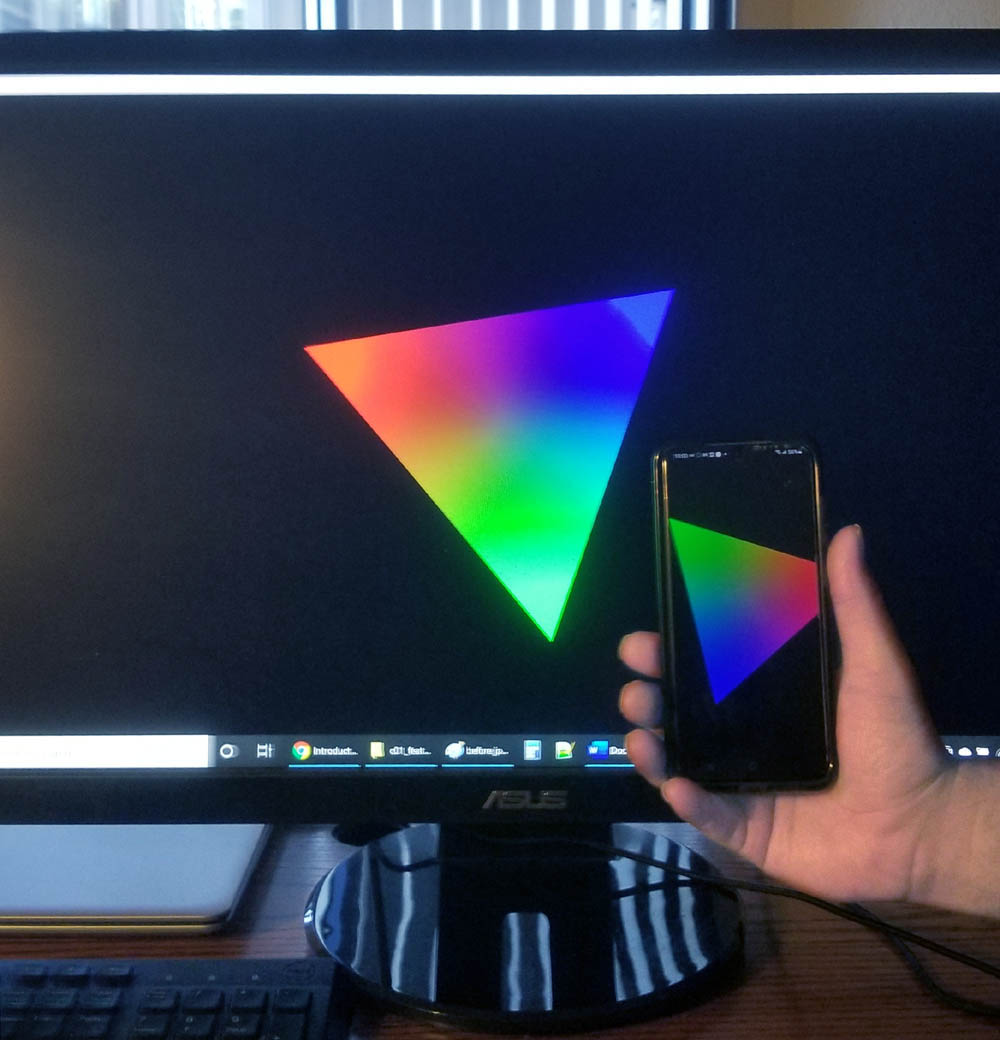
Теперь мы МОЖЕМ сказать, что у нас ЕСТЬ реальный cross-platform!